Flooring Installation Process: What Really Happens From Start to Finish
If you have never been through a flooring upgrade before, the whole thing can feel unclear. You hear terms like subfloor, underlayment, acclimate, glue-down, or locking system, and suddenly, a simple project sounds technical.
The truth is, the flooring installation process is not mysterious. It is detailed, yes, but when handled by experienced flooring professionals, it follows a clear path from prep to the moment your new floor is ready for daily life. Here is what really happens behind the scenes in Dallas homes.
Step 1: Choosing the Right Type of Flooring
Every installation process begins before anyone touches a tool. It starts with your flooring choice.
There are many flooring types available today, including hardwood, laminate flooring, tile flooring, carpet, and vinyl flooring, such as luxury vinyl plank or vinyl composition tile. The right type of flooring depends on how you use the space, your design goals, and your budget.
For example:
- Wood flooring adds natural beauty and long-term value.
- Luxury vinyl plank is durable and handles moisture well in kitchens and laundry rooms.
- Tile works well in bathrooms and high-traffic areas.
- Carpets offer comfort in bedrooms and living rooms.
In Dallas homes, temperature and humidity changes also matter. Some flooring products expand and contract more than others. This is why a knowledgeable installer will walk you through options before the project even begins.
If you are remodeling more than just floors, working with a trusted interior remodeling contractor in Irving can help ensure your flooring complements the entire design.
Step 2: Measuring and Planning the Project
Once you choose your flooring, the process begins with measurements. Professionals calculate square footage carefully to determine how much material to order. Ordering too little delays the timeline, and too much wastes money.
They also plan transitions at each doorway, around every door frame, near vents like a floor register, and into spaces like the entryway or basement. These details matter because clean transitions separate an average job from a polished one.
Depending on the type you select, the installer will also decide on the right installation method, whether that is nail-down, glue-down, floating with a locking system, or tack strips in the case of carpet.
Step 3: Preparing Your Home Before Work Starts
A successful project is as much about prep as it is about installing boards or tile.
Homeowners should prepare their home by:
- Moving furniture and personal items
- Removing fragile decor or sensitive electronics
- Creating clear access points for tools and materials
Contractors will often advise you on ventilation and how to manage dust.
Clear communication at this stage prevents surprises on installation day.
Step 4: Removing Existing Flooring
Now the physical work begins. Removing existing flooring can be noisy and dusty, especially if crews need to remove the existing tile, carpet with tack strips, or an old hardwood floor.
Installers typically use a pry bar to lift out planks or break up outdated materials. In some cases, baseboard and quarter-round molding must be carefully detached so they can reinstall or replace them later.
This stage includes:
- Hauling away debris
- Pulling nails or staples
- Scraping off adhesive
- Ensuring the area is clean
The goal is to create a clean slate for the new flooring to be installed.
Step 5: Inspecting and Repairing the Subfloor
This is one of the most important parts of the flooring installation process, yet many homeowners never see it.
Under your visible floor is the subfloor, often made from plywood secured to each joist.
Sometimes subfloors develop damage or issues like rot, sagging, or squeaks.
Before proceeding, crews prepare the subfloor by:
- Checking that it is flat and smooth
- Reinforcing loose areas attached to a joist
- Replacing damaged plywood
- Sand uneven areas
They also remove any debris so nothing interferes with the new layer. A solid subfloor ensures the finished surface will not shift, crack, or make noise later.
Step 6: Letting Flooring Acclimate
Many flooring materials need to be adjusted before they are installed. Wood, laminate, and some vinyl products need to allow the flooring to acclimate to the temperature and humidity inside your home.
In practical terms, that means storing the boxes indoors for a set period prior to installation. This step allows the flooring to acclimate to the temperature in Dallas, reducing future expansion or contraction.
Skipping this step can lead to gaps or warping weeks after installation is complete.
Step 7: Laying the Underlayment
For many flooring types, installers place underlayment over the subfloor. This thin layer provides cushioning, moisture protection, and sound reduction.
Not every installation method requires it. Glue-down vinyl plank and tile flooring may not need a separate underlayment. However, floating laminate flooring often does.
This layer makes a difference in how the finished floor feels underfoot.
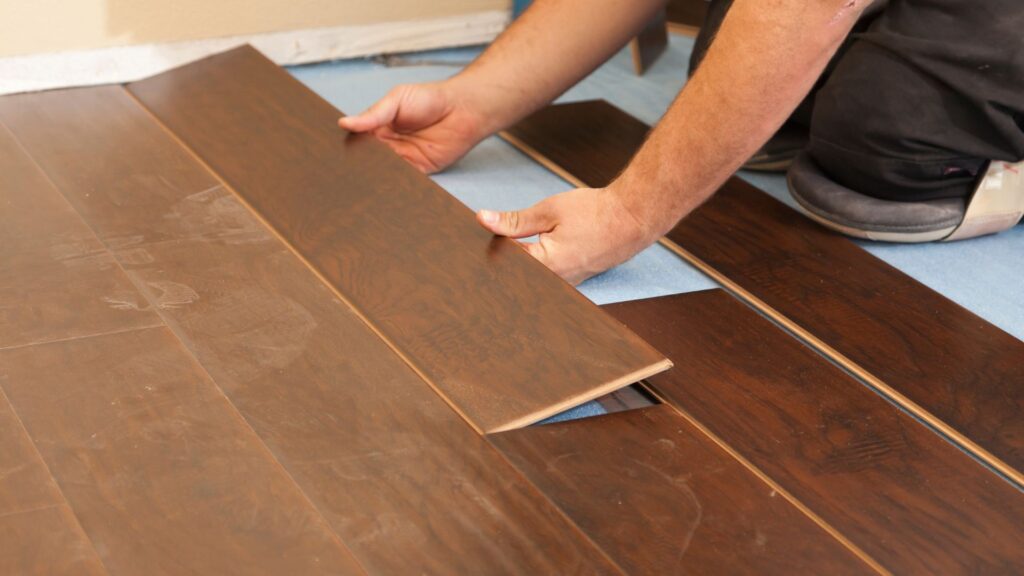
Step 8: Installing the New Floor
Finally, the part everyone waits for.
On installation day, the crew begins with the first row, carefully aligning it along the longest wall. Accuracy here sets the tone for the entire project, and depending on the type of flooring, here is what happens:
- To install hardwood, boards are nailed or stapled into the subfloor.
- To install laminate, planks snap together using a locking system.
- Luxury vinyl plank and tile may be installed as floating or glue-down.
- The carpet is stretched and secured to tack strips along the edges.
Each plank is staggered for strength and appearance. Installers constantly check spacing near walls and around fixtures.
Throughout the entire installation, professionals monitor alignment and spacing, especially around tight areas like a door frame or built-in fixture.
Step 9: Finishing Details and Clean Up
When the boards or tiles are in place, the job is not quite done.
Crews reinstall baseboard or add quarter-round molding to cover expansion gaps. For tile, grout is applied and cleaned. For certain hardwood projects, surfaces may be lightly sanded and sealed.
The team will need to allow adhesives or finishes to cure if required. Proper ventilation helps speed this process safely.
Finally, they:
- Remove any debris
- Vacuum dust
- Wipe down surfaces
- Return moved furniture if agreed upon
Once installation is complete, you receive care instructions tailored to your material.
How Long Does It All Take?
Timing varies depending on square footage, the condition of your subfloors, and the complexity of the layout. A simple room may take a day or two. A full house remodel could take longer.
If your flooring upgrade is part of a larger transformation, such as custom kitchen remodeling services or professional bathroom remodeling services, planning the timeline carefully avoids bottlenecks.
For comprehensive projects, many homeowners combine flooring with full-house remodeling services in Irving, TX, to streamline everything under one team.
Why Professional Installation Matters
Many flooring types may look simple to install in online videos, but small mistakes can cause major problems later.
Improper leveling, rushed measurements, or ignoring acclimation can result in:
- Creaking boards
- Visible gaps
- Uneven transitions
- Premature wear
Working with professional flooring contractors in Irving, TX, ensures the job is done the first time correctly. Skilled flooring experts understand local climate effects, structural considerations like joist spacing, and the best installation method for each material.
At Build Strong Construction & Remodeling, our flooring professionals treat each home with respect and precision, whether it is a single-room upgrade or part of a larger interior remodeling project in Dallas.
Final Thoughts on the Flooring Installation Process
A new floor does more than update a room. It changes how your home feels, how it functions, and how it is valued. When you understand the flooring installation process from removing existing flooring to the final molding touch, the project becomes far less intimidating.
If you are considering an upgrade in Dallas, Texas, talk with experienced professionals who can guide your flooring choice and handle every detail with care. The right team will make the entire experience smooth and deliver results you will enjoy for years.